BOX BUILDING
Please use proper safety equipment and procedures when using power equipment.
The following information is available for you to use at your leisure. If these pages don't give you what you need, just contact us directly
KICKER Customer Service
Email: warranty@kicker.com
Phone: 1-405-624-8510
M-F 8am-5pm Central Time
You can find box building information in the KICKER U app for iOS or Android.
KICKER U app for iOS
KICKER U app for Android
Introduction to Enclosures
When it comes to selecting an enclosure type to get the best sound from your woofer and matching it to your taste in music, it can be a little confusing. The purpose of an enclosure is to improve bass response and prevent woofer damage from over-excursion. There are a few things you will need to consider before making your final selection that will ultimately affect your choice in subwoofer enclosure style. Here are some of the key points you will need to consider:
- How much room is available in your vehicle and how much are you willing to sacrifice.
- What type of speaker will you be using? Some speakers are designed for specific enclosure types. (refer to the manufacturer’s recommendations)
- How much power does the amplifier produce and what type of crossovers and controls does it have?
- What type of music do you listen to? Different enclosure styles will sound slightly different.
Once you have determined the above conditions, you will then be able to make a choice that will get the best bass response. The next sections will outline the most popular types of enclosures to help you make a selection that is right for your listening tastes.
Infinite Baffle
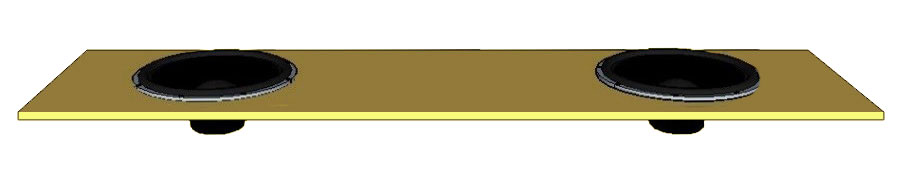
Simple infinite baffle mounting board:
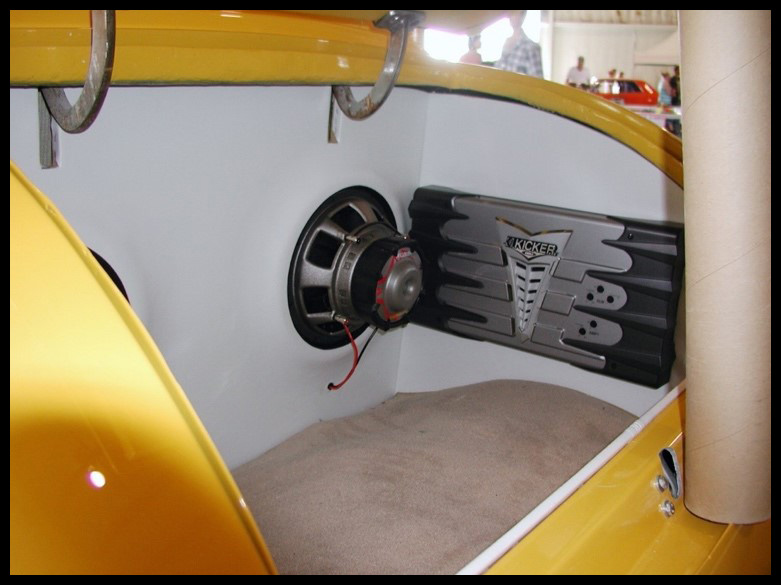
Infinite baffle example:
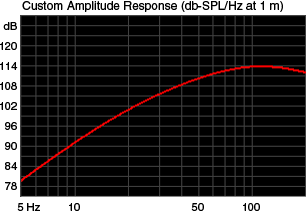
Infinite baffle frequency response curve:
An infinite baffle is not necessarily an enclosure. It can be as simple as a board or mounting surface (called a “baffle”). This can be a flat board with the woofers mounted to it and then attached to back of the seat of a sedan. Another example of infinite baffle is how speakers are mounted in the rear package trays of most sedans. The speakers have no enclosure and the speakers are mounted facing up in the package tray. Many vehicles have subwoofers mounted in the rear package tray infinite baffle right next to the full range speakers. With this type of mounting, the trunk is typically used as the “enclosure”.
Infinite baffle mounting is often considered the best overall sounding of all the examples we are going to talk about. They do not have an enclosure that will change the way the woofer naturally sounds. Since they don’t have an enclosure they will not take up as much room in the vehicle and can be mounted (in some applications) where they may not even be seen as at all.
It’s important to note, infinite baffle does have some limitations.
When mounting woofers in an infinite baffle configuration, you must have a woofer that is capable of operating in an infinite baffle or ported enclosure. You will need to make sure that you seal the mounting baffle as good as possible to the vehicle so that the sound waves from the rear of the speaker cannot reach the front of the speaker to cause cancellation. Remember that bass can travel through anything that is not solid such as the rear seat foam and even other speakers that are mounted near the woofers. Any areas not sealed between the front and rear of the baffle will decrease the amount of bass. An ideal infinite baffle mounting can be a challenge due to the potential difficulty of sealing off the front and rear of the baffle.
Also, since they don’t have an enclosure, there is nothing but the suspension of the woofer to control cone movement. That is why it is important to have an amplifier which has a subsonic filter to eliminate any damaging frequencies reaching the subwoofer. Infinite baffle mounting does limit the total output of the woofer and its power handling. That is why it is best to use a woofer specifically designed for this type of mounting configuration. You also have to make sure you have properly isolated the front and rear pressure waves with the baffle or you will have limited output and bass response.
Pros
- Easy to construct
- Smooth frequency response
- Does not take up much room in trunk
- Uses speakers’ natural frequency roll-off
Cons
- Limited power handling
- Limited output
- Require specific crossover capabilities from amplifier for best results.
- Rear side of the driver is exposed along with the wiring and it may not be a clean looking installation
Sealed enclosures
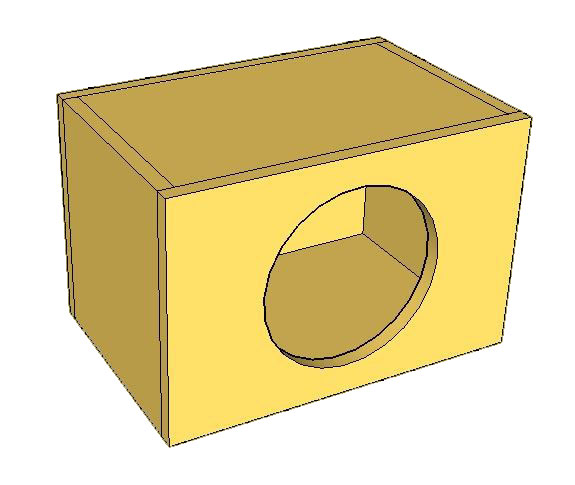
Simple sealed enclosure:
Simple sealed enclosure with internal cabinet bracing:
Sealed enclosure example:
Sealed enclosure frequency response curve:

Violet - large sealed enclosure
Green - small sealed enclosure
A sealed enclosure has a “closed” airspace. They are usually built within a range of internal volume specified from the manufacturer. The internal volume will vary depending on the type of sound you are trying to achieve. Sealed enclosures can have large or small internal volumes with no ports or vents in the enclosure. The air inside the enclosure works as an air spring to control cone movement. They are sometimes called “acoustic suspension” enclosures.
When choosing the proper volume of sealed enclosure for you tastes, you will need to consider the following: A large sealed enclosure will have a smoother output with deeper bass but may also limit power handling because woofer cone has less control at lower frequencies. Too much power at lower frequencies can damage the speaker’s suspension components (surround, spider, tinsel leads, or voice coil former). You must make sure that your amplifier does not produce more power than the woofers is rated to handle in this size of enclosure. This type of enclosure is usually used when you are trying to reproduce music very accurately at a moderate volume. Sealed enclosures are one of the most popular box designs for someone that is looking for very accurate sound reproduction.
Sealed enclosures are usually used when you want loud music reproduction with very good cone control. For example, small sealed boxes are often designed for the older rock, hard rock, or speed metal. These genres of music usually have a good amount of drums in the recording and do not have a lot of very deep bass information in the recordings.
With a small sealed enclosure, the bass will be very “tight” and controlled. The woofer will handle a large amount of power because the enclosure will limit the cone movement at the lower frequencies which could damage the speaker. The smaller sealed enclosure will give you a little more output, or “bump” as it is called, before it rolls off but will start rolling off bass response at a higher frequency than a larger sealed enclosure.
Larger sealed enclosures will play lower bass and are considered to be a bit smoother in frequency response because they have a little less “bump” before they roll off in output. They will not have as much of the punch as a smaller sealed enclosure but will play lower bass overall. They will also take up more space in the vehicle since they require more air volume. They can reproduce low bass response that is very smooth and natural sounding.
The lower bass response in a sealed enclosure will roll off at a rate of 12 dB/octave. This is a smooth gradual roll off that gives them a very good response curve and will not have an excessive peaks in output at certain frequencies.
Pros
- Very accurate bass reproduction
- Tight bass response
- Great power handling
- Somewhat small in size
- Easy to build
- Great low frequency response
- Bass rolls off at 12 dB/octave
Cons
- Requires larger enclosure for deep bass response.
- Will take up more room than infinite baffle.
- Requires more woofers/enclosures/power for more output
Bass Reflex enclosures
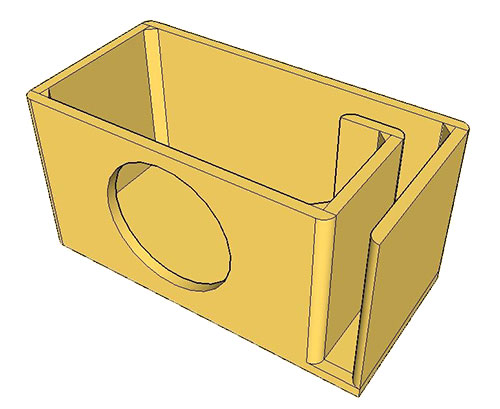
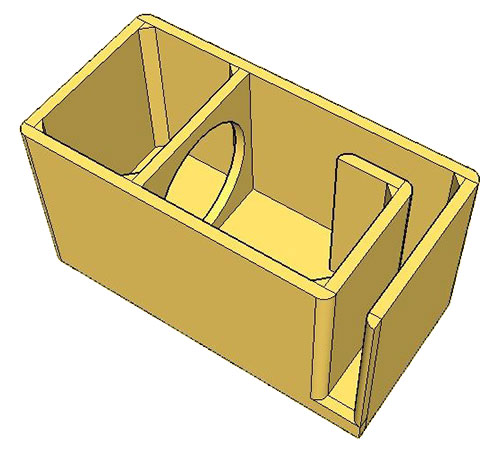
Slot ported enclosure:
(shown without top to view inside)
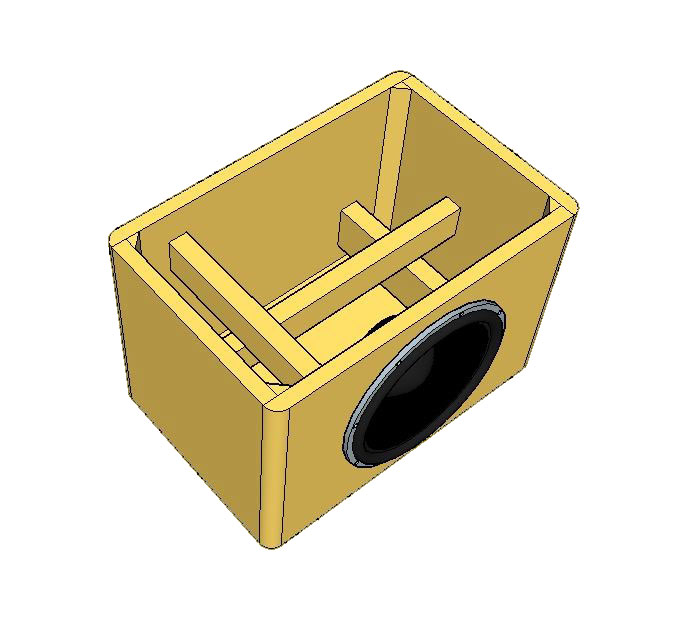
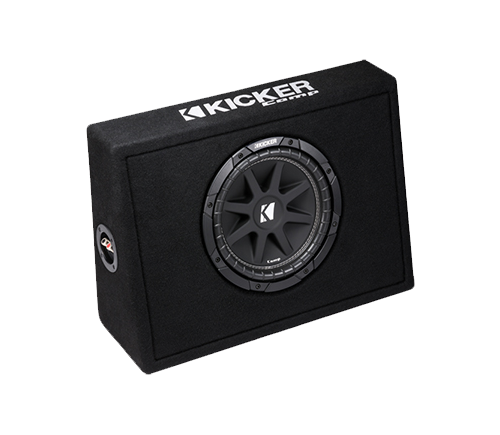
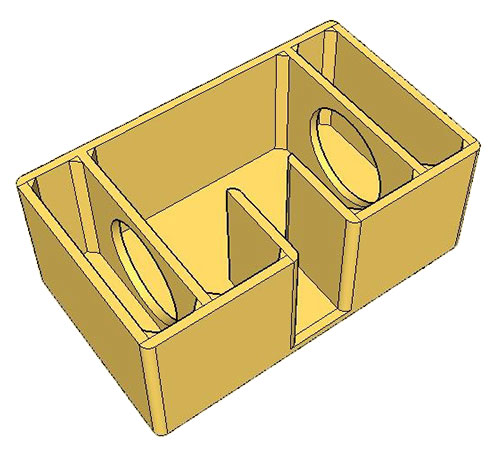
Truck style ported enclosure:
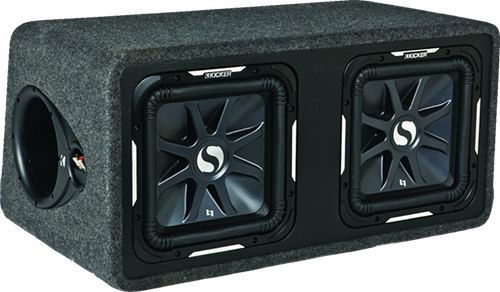
Ported enclosure example:
Ported enclosure frequency response curve:
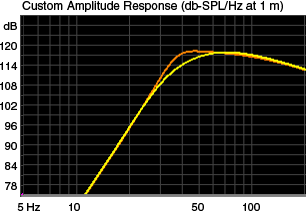
Orange - large ported enclosure
Yellow - small ported enclosure
A Bass reflex enclosure (also referred as ported or vented enclosure) has a port or vent that will increase output at certain frequencies. This type of enclosure is more complicated to construct. You must follow the speaker manufacturer’s specifications to optimize the output and to prevent damage to the speaker. The vent will combine the rear side of the woofers output to the front output of the speaker. It can be tuned to specific frequencies which allow added output around the tuning frequency. The enclosure’s air volume, vent area and length are critical for proper tuning and power handling. If you do not follow the recommend specifications, poor bass response and/or damage to the woofer are very possible.
Ported enclosures are very popular because they can dramatically increase the output at specific lower frequencies. This can be an advantage when extreme output levels are desired or if you are wanting to maximize the output of a subwoofer with a smaller power amplifier. As with anything, there are both good and bad things to consider. To achieve the most output, you will need a very large ported enclosure. This will take up more space in the vehicle. The other factor to consider with a large ported enclosure is they have more “group delay”. This is very rarely discussed but is very noticeable with large ported enclosures. A larger ported box will have more group delay because of the size of the enclosure and its design. This will have a softening effect on the bass. The impact or punch that you will perceive does not “hit” as quite as hard. A large ported enclosure can have substantially more output but at the cost of accurate sound quality. Clear as mud? Good! Glad you understand. Ha ha.
Ported boxes have another set of challenges. The rate at which the bass rolls off on the lower frequencies is 24 dB/octave. This means they will limit the lower frequencies the enclosure can produce twice as fast as a sealed enclosure. The advantage of the ported enclosure is it can play louder before the lower bass starts to roll off. Ported enclosures are often much larger than the sealed enclosures to get them to produce very low bass frequencies.
The other trait of ported enclosures is they have no control of the driver movement, called excursion, below the tuning frequency. This is called “unloading”. This means that below the tuning frequency of the enclosure, the driver will perform as if it was in an infinite baffle. At lower frequencies, it can damage the driver from “over excursion”. This is why smaller ported enclosures handle less power than larger ported ones. Smaller ported boxes cannot be tuned as low as larger ported enclosures. High power levels below the tuning frequency will overdrive the cone movement and damage the speaker.
One of the key ways to control cone movement below tuning frequency is to use a subsonic, or infrasonic filter just like we recommend for infinite baffle. All Kicker subwoofer amplifiers either have a subsonic filter that is fixed at 25 Hz at 24 dB/octave or an adjustable subsonic filter that is variable from 10 – 80 Hz at 24 dB/octave. An adjustable subsonic filter is necessary to maximize your output and protect your speaker. With proper tuning you will have incredible output from the enclosure with maximum protection of the speaker.
When tuning a ported enclosure, you must make sure that you have the proper volume of airspace, the correct port area, and port length. If the port has too little area, the airspeed in the port will be higher and can cause “port noise” at high output levels. This can sound like “whistling” or “chuffing” coming from the port. One way to see if this is happening is to hold your hand or something over the port opening when playing at high power to see if the noise stops. This noise can be reduced and is some cases eliminated by rounding or flaring the ends of the ports but in extremely small ports, the noise is unavoidable. The length of the port is also an important factor and relates directly to port area. For example, if you increase the port area to eliminate port noise, you must also increase the length of the port to keep the tuning to the same frequency.
Now you have another challenge. Large ports sound better but take up more airspace and your enclosure’s total volume increases making the box larger overall. Now it is a balancing act between size, sound, and power handling. You want a ported enclosure to play as low and loud as possible but the louder and lower you want it to play, the more space it will require.
Venting rules:
When you use ports, there are a few things to remember. First and most important is the area and length are very critical for proper tuning. Changing either one will greatly affect sound quality, performance, and durability of the speaker. The vent shape is not as critical as the total area of the vent. It can be round, square, triangle, rectangle, or any other shape as long as the total area is equivalent to what is required for that enclosure. Multiple vents can be used if the total area is equal to the specified design. Also, you must keep the vents away from other surfaces. Example, if you have a 4” diameter round vent, it should not be closer than 4” from the back of the enclosure to prevent it from detuning the enclosure. Just remember the vent must allow air to flow freely without obstruction from either end. A straight vent is better than a vent that has to be bent or folded to fit into enclosure. Bending the vent will also restrict the airflow and will slightly detune the enclosure. Longer vents tune the enclosure to lower frequencies but require more airspace in the enclosure to compensate for their displacement. Small vent areas have shorter lengths but increase airspeed and can have port noise.
A smaller ported enclosure will not play as low as a larger one can play. This is because the smaller ported enclosure does not have enough airspace to tune it to a lower frequency. To tune a ported box to a low frequency, you must use a larger enclosure with a larger and longer vent. In a smaller enclosure, this gets very difficult to fit the port into the enclosure due to the limited volume of airspace you have to work with. This will limit the tuning of the enclosure to a higher tuning frequency.
Pros
- Increased output
- More efficient
- Great power handling
Cons
- Harder to build
- Larger than sealed enclosure
- Must be tuned to specific driver and enclosure volume
- Bass is not as tight sounding
- Bass rolls off at 24dB/octave
- Can have “port noise” if built incorrectly
Bandpass enclosures
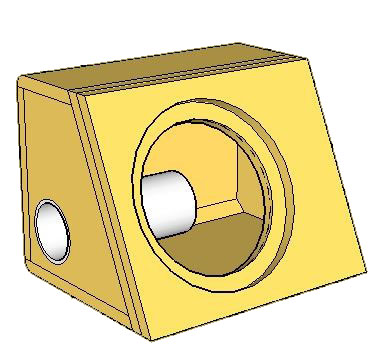
Bandpass Enclosure Example:
3 Chamber Bandpass Enclosure:
Bandpass Enclosure Example:
A symmetrically loaded (bandpass) enclosure is designed to pass the entire output of an enclosure through a vent smaller than the surface area of a speaker. A bandpass enclosure uses both a sealed and a ported chamber. The woofer is mounted inside of a two chamber enclosure in the divider between them. One of the chambers is vented to the outside environment.
The main advantage of a bandpass enclosure is to allow significant output through a small opening. They can also be tuned to provide increased output in a narrow band of frequencies. They do share a lot of the traits of both sealed and ported enclosures. The size of the sealed chamber will affect the low frequency response. For deeper bass it will require more airspace, thus a larger box. The ported side tunes the upper frequency response and output level. A larger ported chamber will give a wider band of passed frequencies but will sacrifice output of the enclosure. As with a ported box, the port area and length will greatly affect output and frequency response as well as quality and the reliability of the speaker.
Other concerns with bandpass types of enclosures is with sound quality. Since the speaker is completely enclosed inside the cabinet, they have much more group delay. This means the bass will be delayed from reaching your ears at the same time as the sound energy from the other speakers in the system. This produces a sound that many have described as “slow” or “mushy” bass. Some of this time delay can be improved with the use of a DSP to delay the other speaker’s signals to bring the music “back into phase” for a more natural sound.
The output of the bandpass boxes are not extremely flat or smooth in frequency response. This means that some frequencies are louder than others and will not accurately reproduce the music as it was recorded. The smaller bandpass enclosures produce the least flat response but can have a huge increase in output in a specific, smaller, frequency band. The last thing to consider is bandpass boxes will “mask” distortion making it harder to localize the subwoofer but with a tradeoff. I you are clipping your amplifier’s output, it will not be as easy to hear the distortion and you are more likely to damage the speaker and possibly the amplifier.
Pros
- Can be more efficient at specific frequencies.
- Can allow porting of bass through smaller openings into listening area
Cons
- They mask distortion.
- They are more likely to damage speaker.
- Degraded sound quality.
- Harder to construct.
- They can become quite large
- Harder to replace speaker
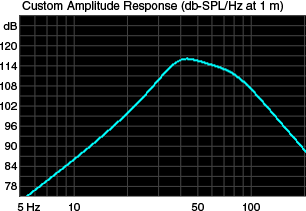
Comparison graph of different types of enclosures with the same woofer:
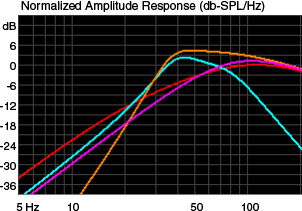
Orange - large ported enclosure
Teal - bandpass enclosure
Red - infinite baffle enclosure
Purple - large sealed enclosure
Isobaric Enclosures
Isobaric enclosures are designed to get the maximum bass from a very small space. An isobaric enclosure is a unique type of enclosure where you use two woofers and couple them together to act as a single woofer with twice as much pushing power. The biggest advantage is the enclosure requirement for this style is half of the size of the recommended sealed enclosure for the speaker. This means you can get great bass out of a very small space. The disadvantages to this enclosure design is you have to buy double the number of speakers and you have to power each one as if it were playing by itself. This means double the power requirement as well. Since you are essentially overlapping two speakers, the overall output will be the same a single speaker.
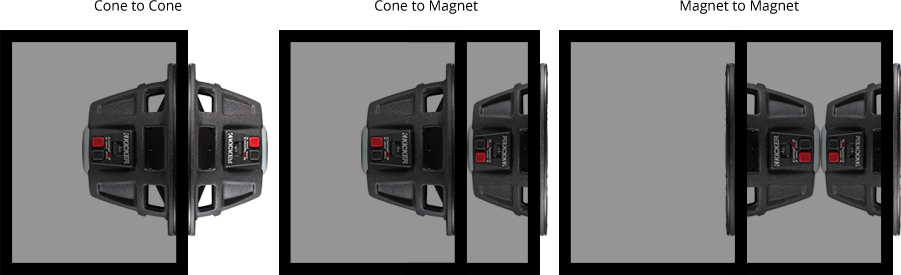
Construction is very simple. Once you know the volume of enclosure a single speaker requires, you can reduce the internal air volume to one half the original specification. The woofers can be mounted into the enclosure face to face with the outward woofer wired out of phase with the woofer that has its magnet inside the enclosure. This will give a push/pull effect and will double the strength of the woofers allowing them work in very small space. The woofers can also be coupled with airspace between them in either a face to face, magnet to magnet, or face to magnet.
The other advantage of mounting woofers face to face or magnet to magnet, it will smooth out the non-linearity properties of a speaker. With older speaker designs, the pushing force was sometimes not as strong as the pulling force. This created distortion because it would not accurately reproduce the signal the speaker received. Isobaric helped reduce this distortion but with today’s technology, it is no longer necessary.
This type of enclosure is no longer very popular because of the woofer technology that we currently use. Some of the woofers today require very little airspace to produce great sounding, deep bass eliminating the need to cut the box volume in half. In fact, Kicker perfected this by designing the “Solobaric” woofer back in 1992. Kicker combined the electrical and mechanical properties of two woofers into the single Kicker Solobaric woofer. It had all the bass as a conventional woofer, but in ½ the internal volume requirement of conventional speakers.
Sealed isobaric examples:
More Info:
Building and Designing Enclosures
Building the Enclosure
When building an enclosure, the enclosure's walls should be as rigid as possible. Any flexing in the enclosure will drastically decrease your speakers' performance. Also, all of the joints and walls in a speaker enclosure should be airtight, including screw holes and wire holes. Any leaks or flexing will cause cancellation, resulting in reduced output.
Enclosures should be built with very dense and heavy wood. We recommend MDF (medium density fiberboard) or Medite (high density fiberboard), They are rigid, heavy and not porous like some particle boards. We recommend 3/4" (19mm) MDF although 1/2" (12.5mm) MDF is acceptable for woofers 8" and smaller.
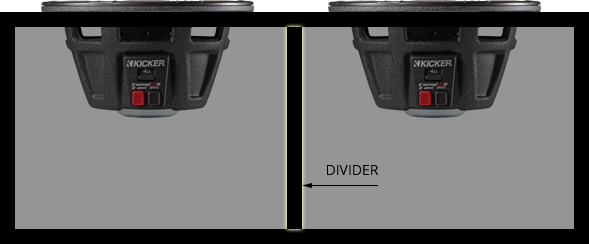
Most enclosures are built for multiple drivers and require separate chambers for each driver. Dividers are a very important part of box building because they create strength in the box and provide an airtight seal between the speakers. Keep in mind that no two things are created equally (even speakers of the same size and model!), This will cause drivers in an open chamber to react differently, substantially reducing output and power handling. When assembling the box it is very important to glue all joints. Screws or staples should be placed approximately every 4" (10cm). Drywall screws work better if they are counter-sunk. Countersinking makes it easy to fill over the screw heads for paint or carpet, and improves the appearance of the enclosure.
A quality air stapler has been proven to be a good substitute for counter-sunk drywall screws. Use 1-1/2" (38mm) or 1-5/8" (41mm) staples at least every 3" (7.5cm) along every seam. Don't forget the wood glue. This is much faster and smoother than using screws.
Glue joints all the way across the wall to provide an airtight seal. We recommend Titebond or Elmer's Wood Glue.
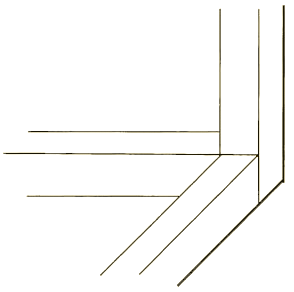
It is always a good idea to use corner braces, also called glue blocks, on each joint in an enclosure. Corner braces are usually made from left-over enclosure wood and measure approximately 1" (2.5cm) wide. The braces should be glued and screwed or stapled to the walls and caulked on both edges where they meet the walls. Use a silicone caulk to ensure the airtight seal. Don't use "bathroom tile" type caulk, it won't do the job!
Not all corner braces will be the length of the wall they're attached to. For example, if a wall's length is 36" (1 m), but there is already a corner brace on the adjacent wall, we'd need to deduct one inch (2.5cm) so that the braces fit together - not overlap. Deduct two inches (5cm) from a brace's length if there are braces on both adjacent walls.
When adding braces to an enclosure always add the displacement of the extra wood to the gross box volume as it is designed.
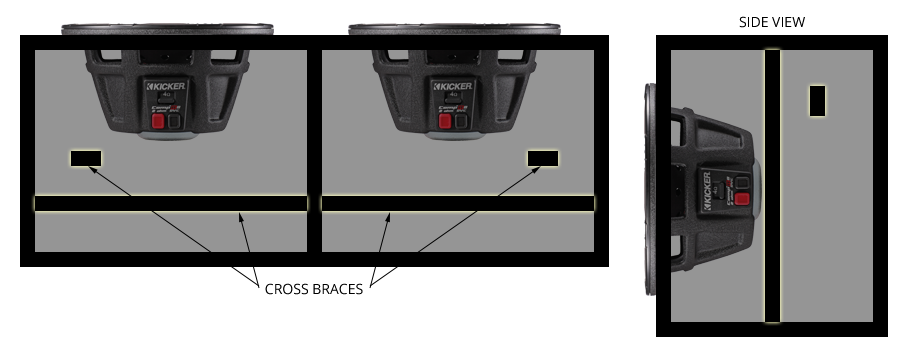
Another type of brace, called a cross brace, should be used in any span that is 12" (30cm) or more to prevent panel vibration. The most common application will be from the front baffle to the rear wall and between the top and bottom walls. This type of brace is usually made of 3/4" x 2" wood. The brace will contact the enclosure only on its ends where it should be glued and screwed or stapled. Place the brace slightly off center for maximum rigidity. A perfectly centered cross brace can actually increase cabinet flex and resonance (at a higher, more audible frequency).
Designing General Enclosures
The fundamental Thiele-Small calculations can be performed using a scientific calculator and a little knowledge of algebra. However, it is important to note that the basic calculations have some factors averaged or removed for simplicity, and the answers they give are only approximate. Your best bet is to use known enclosure design data such as given here, or to use a computer program such as LEAP 4.5 along with our published driver specifications to assist you in designing enclosures.
When you have completed your enclosure, it is important to make sure the speaker is at least close to your design specs. Fori 00% certainty that everything is correct, you may want to measure the box tuning frequency for vented enclosures. If you did the calculations by hand or with a simple computer program (any program that requires only Qts, Vas, and Fs for enclosure performance calculations is simple), you will definitely want to measure tuning frequency because the vent dimensions given by the calculations could be off enough to reduce the speaker's performance. Be sure to measure the tuning with the enclosure in the vehicle, the acoustic environment of the speaker can also affect its tuning.
When designing an enclosure, it is best to follow what we call "The Design Sequence." This is a simple, three step process that can save you a lot of time and hair pulling!
The Design Sequence
- Determine size of enclosure.
- Calculate and subtract driver, brace and port (if ported) displacement from enclosure volume.
- Finalize driver selection.
Step One: Determine size of enclosure.
This is the easy part. Get a tape measure and get in the vehicle. Consult your customer on exactly how much space he or she is willing to forfeit for their system. Measure this area and write down the height, length and width dimensions in inches.
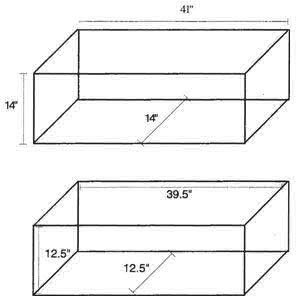
Now we'll learn how to calculate volume for a cabinet from the dimensions we just took. Let's say the space we have available is: 14" High x 41" Long x 14" Wide
The formula for figuring volume is pretty simple. Memorize it now, you'll be using it a lot!
Height x Length x Width = Total Cubic Inches
Total Cubic Inches / 1728 = Total Cubic Feet
Total Cubic Feet / # of Drivers = Total CubicFeet Per Driver
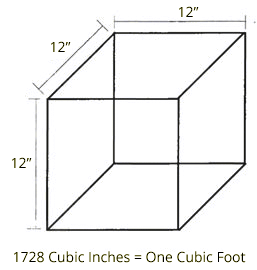
What is 1728 and where did that come from? 1728 is one cubic foot or 12 x 12 x 12. Dividing by this figure converts total cubic Inches into total cubic feet. You'll want to divide total cubic feet by the number of drivers to be installed in the enclo¬sure, usually two, to get the total cubic feet per driver. This is how the manufacturer usually lists specifications.
When calculating an enclosure's volume, you will work with EXTERNAL and INTERNAL dimensions. External dimensions are what you have after measuring the space available in the vehicle. Internal dimensions are what you'll want to go by when selecting a speaker for the enclosure. What's the difference? The thickness of the wood used to build the box. For example, if using 3/4" wood, you'd subtract double the thickness of the wood from each dimension to get internal dimensions.
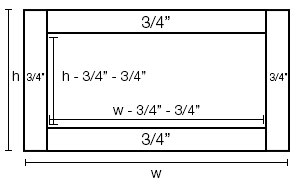
Let's look at our example again and figure the internal dimensions using 3/ 4" wood.
3/4" + 3/4" = 1.5"
14"-1.5" = 12.5"
41"-1.5" = 39.5"
14"-1.5" = 12.5"
12.5x39.5x12.5 = 6171.88
INTERNAL cubic inches
6171.88/1728 = 3.57
INTERNAL cubic feet
3.57 / 2 drivers = 1.79 cu. ft. per driver
Step Two: Calculating Displacement
Displacement refers to the space used by things inside an enclosure that influence total volume and is mostly associated with the drivers in an enclosure. However, other factors will also influence an enclosure's total volume, like ports and bracing. To calculate exact enclosure volume, we'll need to consider port, bracing and speaker displacement.

Port Displacement: Calculating the amount of space taken by a port will test your memory of high school Geometry! The formula itself looks pretty simple: Area x Length = Volume. First you'll need to know the port's dimensions. For an example we'll use a 12" long port with a 2" diameter. Now we need to calculate the area of a circle the same size as the port, 2" in this case. (This is where Geometry comes in!) The area of a circle is the radius squared multiplied by "pi" or 3.14". Area of a Circle = r2 x 3.14 The radius of our circle is 1" (half of the diameter). 12x 3.14 = 3.14" Next, we'll multiply this by the port's length, 12". 12" x 3.14" = 37.68 cu. in. So, to get the accurate volume of the enclosure, we'd need to deduct 37.68 cu. in. from the total volume.
Brace Displacement: After figuring port displacement, brace displacement is relatively easy. Braces are discussed in detail a little later so trust us for now. We'll use a 1" x 1" x 20" brace for an example. All we do is multiply the dimensions together (1" x 1" x 20" = 20 cu. in.) and deduct this amount from the cabinet's total volume. Piece of cake! Remember to do this for all braces in the enclosure, there may be quite a few of them!
Driver Displacement: The driver also takes up air space inside the enclosure. If you use Kicker speakers, we've made calculating driver displacement real simple for you, just look at the chart on appendix page 25. The recommended enclosure volumes we give in the charts already have driver displacement deducted. If you use our speakers and go by that chart, you won't have to figure driver displacement. Let's get back to our example again. We currently havel .79 cu. ft. per driver before displacement. This size box might work for a 12" driver or a 10" driver. Let's calculate driver displacement now to where we are.
12" driver displacement = 0.0538 cu. ft. 1.79 - 0.0538 = 1.736 cu. ft. per 12" driver
10" driver displacement = 0.0334 cu. ft. 1.79 - 0.0334 = 1.757 cu. ft. per 10" driver
Now we'll look at braces. Two different types of braces are corner braces and cross braces. For this example, we are building a sealed enclosure in a simple rectangular box. We'll have twelve corner braces (one for each joint), and six cross braces (one for each wall).
We have eight corner braces that are 1"x 1"x 12.5". Each one uses 12.5" cu. in. of our enclosure's total volume, so eight of them use: 8 x 12.5" = 100 cu. in.
Four of our corner braces are 1" x 1" x 37.5". We deducted two inches from the length so the braces would meet instead of overlap the other corner braces. Each one of these use 37.5" cu. in. of our volume, so multiply this figure by four=4x 37.5" = 150 cu. in.
So all bracing combined uses 250 cu. in. Now we'll divide by 1728 to convert to cubic feet.
250 cu. in. / 1728 = 0.0289 cu. ft.
Now we go back to the enclosure volume figures we got after figuring driver displacement and deduct brace displacement:
12" driver 1.736 - 0.0289 = 1.7071 cu. ft.
10" driver 1.757 - 0.0289 = 1.7281 cu. ft.
Result - we use 12" Kicker Competition woofers in a sealed enclosure! Another possibility though, is the 10" Freeair driver in a ported enclosure. It can be quite a long process to figure all these different things, but trust us, going through all the trouble is worth it when you get done and have an enclosure that sounds awesome!
Let's say you're measuring a customer's vehicle for available space and it's basically unlimited in one direction. If two dimensions are known and the other is unset, we have another way to calculate volume for a specific speaker. For example, we'll say the customer wants to use our Competition 12" driver. We know that the recommended enclosure volume for a C-12 is 1.75 cu. ft., so for two it's 3.50 cu. ft. Our two known dimensions are 39.5" and 12.5" (internal). First we'll find the total cubic inches on our two known figures, just multiply them together.
39.5" x 12.5" = 493.75"
Next we need to figure the total cubic inches needed for two C-12's. All we do is multiply 3.50 cu. ft. (recommended for two C-12's) by 1728 to convert to inches.
Now we divide the total cubic inches needed (6048) by the cubic inches that we have already (493.75) to determine the missing dimension.
6048 / 493.75" = 12.25 inches for the width
To check this, multiply all three figures:
39.5" x 12.5" x 12.25" = 6048.44 cu. in.
6048.44 / 1728 = 3.50 cu. ft.
Angled Enclosures
To figure enclosure volume on angled boxes, draw a diagram of your enclosure. It will help a lot to visualize what you're doing.
Using Figure A
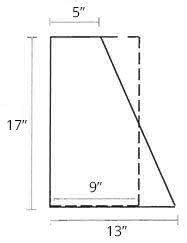
fig. A
17" High x 54" Long x 5" Top and 13" Bottom
Since the formula to determine enclosure volume does not allow for two different width dimensions (5" Top and 13" Bottom), we must find an average of these two figures.
To find the average, add the figures together (5 + 13) then divide by the number of figures added (2).
5"+ 13" = 18" 18"/2 = 9"
In essence, averaging the 5" width and 13" width gives us a rectangular box to work with instead of an angled one (note the "dotted line" enclosure). Now the formula for figuring volume works.
3.53 / 2 = 1.765 cu. ft per driver
To calculate internal volume, you must subtract the thickness of the wood. We're using 3/4" MDF again, so deduct 1.5" from each dimension.
54" - 1.5" = 52.5"
9"-1.5" = 7.5"
17"-1.5" = 15.5"
52.5" x 7.5" x 15.5" = 6103.13 cu. in.
6103.13 71728 = 3.53 cu. ft
Angled Enclosures With Risers

fig. B
This type of enclosure (fig. B) is a little more difficult to work with than just an angled enclosure, but we'll help you through. Follow the calculations below for volume on an angled enclosure with a riser.
Using Figure C.
Dimensions: 17" High x 44" Long x 5" Wide (Top) and 13" Wide (Bottom) with a 4" riser.
First, make the box into a rectangle like we did before by averaging the top and bottom width measurements:
5 + 13=18 18/2 = 9
Instead of using the entire height dimension, deduct the height of the riser, 4" for this example.
17" - 4" = 13" High
So the external dimensions for the first part are (fig. C):
13" High x 44" Long x 9" Wide
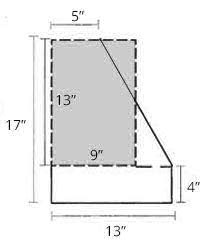
fig. C
We'll go ahead and figure the volume of this enclosure (using internal dimensions). Subtract only one thickness of wood from this height.
12.25 x 42.5 x 7.5 = 3904.68 cu. in.
3904.68 / 1728 = 2.25 cu. ft.
2.26 cu. ft. 12 = 1.13 cu. ft. per driver
Notice that there is a 4"x44"x13" enclosure left over. This is just another airspace that we'll figure volume for and add to the first part. (Use internal dimensions!) Again, subtract only one thickness of wood from this height.
3.25 x 42.5 x 11.5 = 1588.43 cu. in.
1588.43 / 1728 = 0.92 cu. ft.
0.92 cu. ft. / 2 = 0.46 cu. ft. per driver
Now, add 0.46 cu. ft. to the first figure:
0.46 + 1.13 = 1.59 cu. ft. total per driver This is your net internal airspace for each side of this enclosure.
More Info.
Box Building Hints
All the cubic feet numbers given in the supplied charts include the displacement of the woofer. For the ported boxes, the displacement of the port must be added to the final design. It will be impractical to use round ports for these designs. The rectangular port information given will yield the best results.
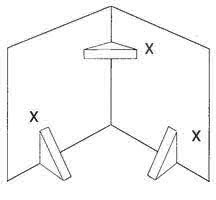
Always use 3/4" or thicker MDF and make sure all the joints are secure and well sealed. The peak pressure in a ported box can exceed that of a sealed enclosure. All of these designs need some internal bracing. Be sure to add 2"x2" to 3"x3" triangle braces between each of the larger unsupported panels. Kicker recommends using a good grade of wood glue and silicone sealer for an airtight box.
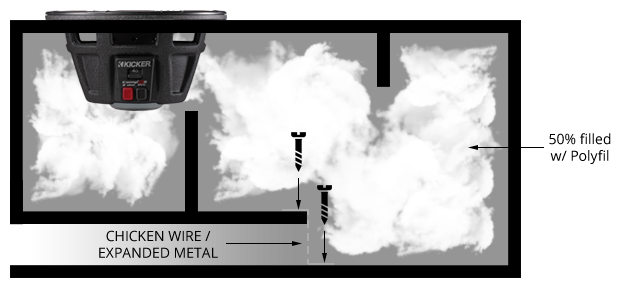
Note:If you prefer an ultra-smooth bass response, you should loosely fill your ported Solo-Baric Enclosure with polyfil. If you do so, the entrance to the port (inside the box) must be covered with hardware cloth, chicken wire, or expanded metal to prevent the polyfil from being blown out through the port. Use of polyfil will slightly decrease efficiency, but will deepen and extend low bass response.
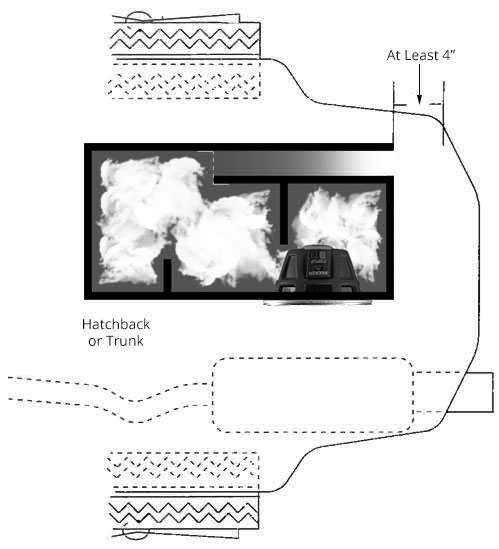
Do not install a ported box with the port against a solid surface. The port opening must remain unobstructed. Use the smallest dimension of the rectangular port as the minimum amount of space required between the port and any surface to insure unrestricted airflow.
If you would like to use a vented enclosure, but the box designs we provide you with (in this manual) do not fit because of width or depth, the designs can be modified. The shape of the enclosure is not vital, but The Volume Is. The volume, of the design you choose, must stay the same. The following diagrams provide you with some help to insure your enclosure is built correctly.
Front:
Top:
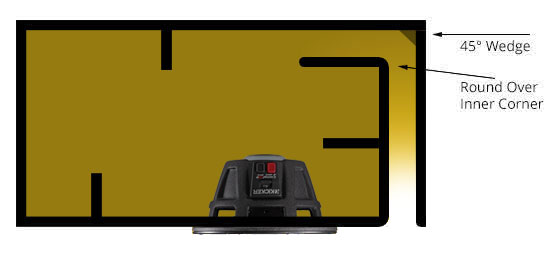
If you are going to bend the port at 90° you will need to add 1/2 of the ports height to the length! See Below.
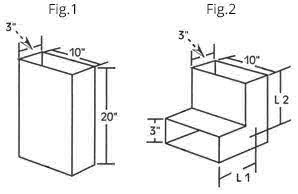
Example:
(Fig. 1)
Hport = 3"
Wport= 10"
Lport = 20"
(Fig. 2)
Since Hport is 3" you need to add 1.5"( 1/2 Of Hport) tO Lport. This means that L1 + L2 = 21.5".
Always measure L1 and L2 down the center to get an accurate measurement!
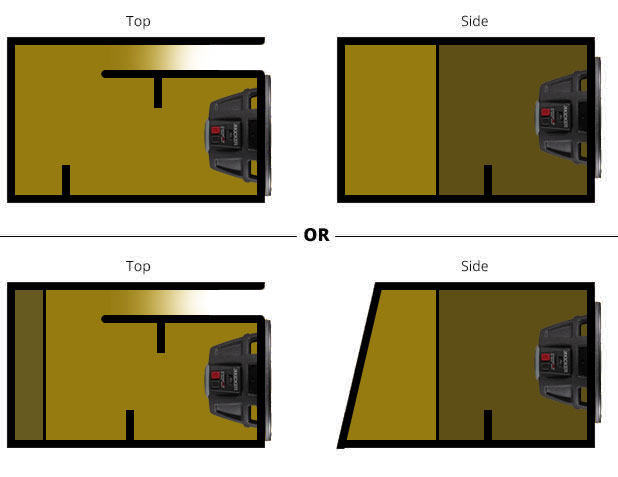
Here are a couple more examples of the different shape enclosures you can build. The woofer can be mounted on the same side as the port or the back side of the enclosure can be slanted to fit up against your back seat.. On the cut sheets we provide, change the dimensions to accommodate the woofer and the vent on the same side. Make sure the internal volume does not change!
More Info.
Conversion Chart
Sometimes an installer needs to calculate the volume of some geometric shape or units of measure. Below are some formulas that should help out.
Triangle Area = 0.5x (Base) x (Height)
Circle Area = (Radius) x (Radius) x 3.1415
Circle Area = (Radius) x (Radius) x 3.1415
1 inch = 25.4 mm
1 mm = 0.0394 inches
1 liter = 0.0353 cubic feet
1 cubic foot = 28.32 liters
1 gallon = 0.134 cubic feet
1 cubic foot = 7.48 gallons
1 cubic foot = 1728 cubic inches
1 cubic inch = 0.00433 cubic feet
Volume (Cubic inches) = (Length) x (Width) x (Height)
milli = 0.001 micro= 0.000001 kilo = 1000 Mega = 1,000,000
|
Port Diameter |
Inside Area |
Outside Area (1/4 in walls) |
Outside Area |
|
1 in |
0.785 sq in |
1.767 sq in |
0.89 x 0.89 in |
|
1.5 in |
1.767 sq in |
3.142 sq in |
1.33 x 1.33 in |
|
2 in |
3.142 sq in |
4.909 sq in |
1.77 x 1.77 in |
|
3 in |
7.069 sq in |
9.621 sq in |
2.66 x 2.66 in |
|
4 in |
12.566 sq in |
15.904 sq in |
3.54 x 3.54 in |
|
5 in |
19.635 sq in |
27.758 sq in |
4.43 x 4.43 in |
|
6 in |
28.274 sq in |
33.183 sq in |
5.32 x 5.32 in |
|
8 in |
50.265 sq in |
56.745 sq in |
7.09 x 7.09 in |
More info: